Build a Smart Motion Controller with KW007, ESP32, ESPHome and Home Assistant

Article: Build a Smart Motion Controller with KW007, ESP32 and Home Assistant
The Keywave KW007 is more than a simple motion switch.
Connected to an ESP32 running ESPHome, the KW007 can report motion and movement direction directly into Home Assistant, while allowing you to adjust detection range and other sensor settings from the Home Assistant interface.
In this project we will connect a KW007-SE 5.8 GHz radar sensor to an ESP32-C3, add it to ESPHome and Home Assistant, then look at how the sensor can become part of a complete occupancy or automation system.
You can start with lighting, but you do not have to stop there.
What you need
For this example:
Item | Purpose |
|---|---|
Keywave KW007-SE (pihut) | 5.8 GHz radar motion sensor |
ESP32-C3 development board (pihut) | Reads the sensor and connects it to Wi-Fi |
USB cable | Programming and power |
Jumper wires | Connections |
Home Assistant (official) | Automation and dashboard |
ESPHome (official) | Firmware for the ESP32 |
The KW007 ESPHome package already provides the sensor interface and Home Assistant entities, so you do not need to write the radar driver yourself.
KW007 SDK for ESPhome32 in Github:
https://github.com/namexavailable/Keywave_Modules/tree/main/KW007/SDK_by_MCU_and_ESPHOME
[Screenshot: KW007 + ESP32-C3 + required parts]
1. Connect the KW007 to the ESP32-C3
KW007 communicates with the ESP32 through I²C.
For the ESP32-C3 Mini example used in our ESPHome package:
KW007 | ESP32-C3 |
|---|---|
3.3 V | 3.3 V |
GND | GND |
SDA | GPIO8 |
SCL | GPIO9 |
The software configuration therefore uses:
Important!!!
ESP32-C3 boards can use different GPIO layouts, so check the pinout of your particular development board before connecting it.
For I²C/software-control mode, Range1 must be low before startup. On KW007-SE this is already handled by the module configuration; for other implementations it can be connected to GND as specified in the programming documentation.
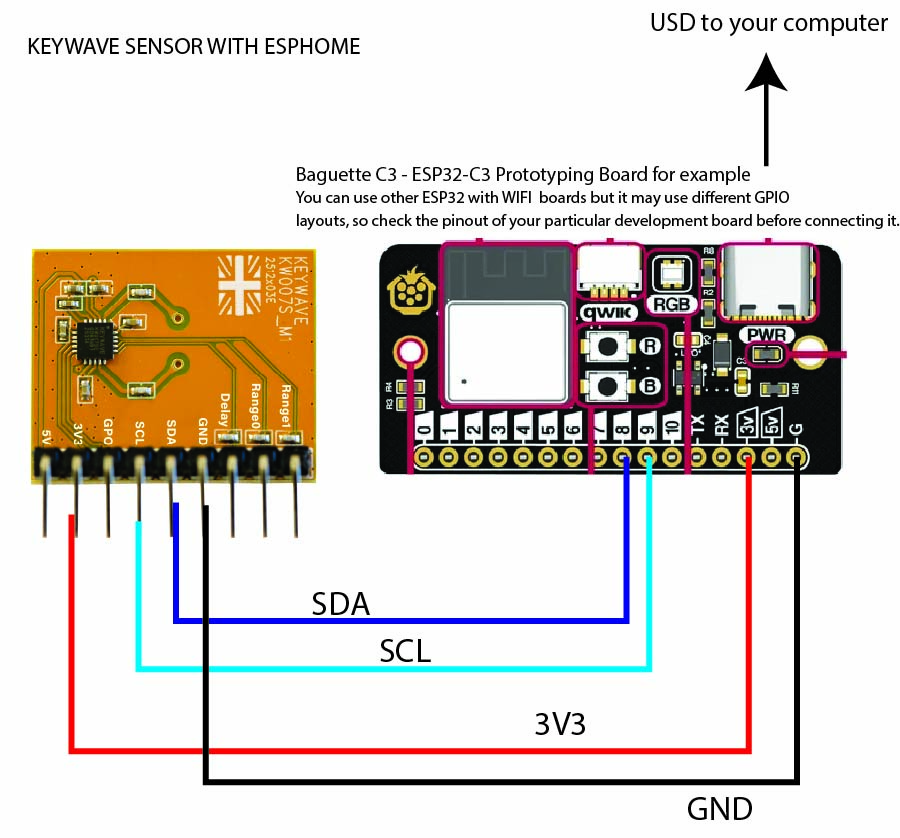
Power note
Use either the 3.3 V input or the 5 V input, never both.
For this project, 3.3 V is recommended.
Never connect 5 V to the KW007 3.3 V input.
2. Install the KW007 ESPHome configuration
The Keywave ESPHome package contains the configuration needed to communicate with KW007 and expose its functions to Home Assistant.
The package includes:
Create your secrets.yaml file and add your Wi-Fi information:
Then connect the ESP32-C3 by USB and install the ESPHome configuration.
For example:
After installation, ESPHome should initialise the KW007 and show a message similar to:
The KW007 I²C address is:
The sensor supports both 100 kHz and 400 kHz I²C; the supplied configuration uses 100 kHz as the conservative default.
[Screenshot: ESPHome successfully detecting KW007]
3. Add it to Home Assistant
In Home Assistant go to:
Settings → Devices & services → Add Integration → ESPHome
Select or enter the address of your ESP32-C3.
Once connected, Home Assistant will automatically expose the KW007 entities.
You should see:
Sensor information
KW007 Motion
KW007 Approaching
KW007 Leaving
KW007 Direction
KW007 RSSI
Adjustable controls
KW007 Detection Range
KW007 GPO Delay
KW007 Detection Update Rate
[Screenshot: Home Assistant KW007 device page]
4. See which way something is moving
One useful difference between KW007 and a basic digital motion sensor is that you can use its Doppler information to distinguish movement direction.
Approaching
KW007 Approaching becomes active when movement is detected toward the sensor.
Leaving
KW007 Leaving becomes active when movement is detected away from the sensor.
Motion
KW007 Motion provides a simpler combined status:
Direction
For dashboards you can also display:
The KW007's internal Approach and Leaving flags update at approximately 8 Hz.
[Screenshot: Approaching / Leaving changing in Home Assistant]
This means your automation does not always have to ask only:
“Did something move?”
It can also ask:
“Which way was it moving?”
That opens up considerably more interesting controls.
5. Adjust the sensor directly from Home Assistant
One of the most useful parts of this example is being able to tune the KW007 without rebuilding the firmware each time.
Detection Range
The ESPHome example provides eight range presets.
Setting | Approximate range |
|---|---|
Level 1 | ~20 cm |
Level 2 | ~50 cm |
Level 3 | ~1 m |
Level 4 | ~3 m |
Level 5 | ~5 m |
Level 6 | ~7 m |
Level 7 | ~10 m |
Level 8 | ~12 m, enhanced mode |
The ranges are typical estimates and will vary with target, installation and environment. The current programming guide defines these presets using combinations of gain, threshold, sensitivity and enhanced-range settings.
A good place to start is:
Then increase or reduce the range to match the area you actually want to monitor.
Do not automatically select the longest range.
For a desk, doorway or small room, a shorter controlled detection area can often produce a better automation than detecting everything nearby.
GPO Delay
KW007-SE provides these hardware hold-time options:
The delay determines how long the hardware GPO remains active after motion has stopped.
For Home Assistant projects, 1 second is a useful starting point, because the higher-level automation can then decide how long a device should remain on.
Detection Update Rate
The example provides:
For most projects:
is a good starting point.
This controls how frequently the ESP32 reads the KW007 status. It does not change the sensor's own internal detection rate.
[Screenshot: Home Assistant range / delay / update controls]
6. First project: control a light
The simplest automation is:
But Home Assistant allows you to make the behaviour considerably better than a traditional motion-controlled light.
For example:
Then:
The important idea is that the sensor does not have to contain the entire behaviour of the product.
KW007 detects what is happening.
Home Assistant decides what that information means.
From motion detection to occupancy control
This is where the project becomes more interesting.
A motion sensor answers:
Has movement occurred?
An occupancy controller needs to answer:
Should I currently consider this space occupied?
Those are not always the same question.
The longer lighting-control article you referenced makes an important point here: a useful control system is not simply a sensor connected to a timer. The control logic has to consider how the room is actually used.
KW007 in this configuration is a motion sensor, not a dedicated stationary-human-presence sensor. Its Motion state is derived from the Approach and Leaving information and should therefore not be treated as continuous stationary occupancy.
But Home Assistant gives us another layer where we can create an occupancy decision from multiple pieces of information.
Questions to ask when building occupancy control
“Should the light go off immediately when motion stops?”
Usually no.
Create an occupancy timeout.
For example:
For a hallway that timer might be short.
For a workshop or kitchen it may be longer.
The sensor detects movement; your automation defines the experience.
“Can I use Approaching and Leaving instead of just Motion?”
Yes.
For a doorway-facing installation you could experiment with:
This can make the behaviour feel more intentional than treating every movement identically.
It should not be treated as a people counter, however. Approaching and Leaving describe Doppler movement direction; they do not maintain an accurate number of occupants.
“What happens if somebody stops moving?”
If reliable stationary-person detection is required, motion alone should not be your only occupancy input.
Home Assistant can combine KW007 with other information such as:
You can therefore build an occupancy controller, rather than expecting one sensor to make every decision.
For applications requiring dedicated stationary human presence sensing, Keywave's KW307 is designed for that different sensing problem.
“Should I use the longest detection range?”
Usually not.
Set the sensor to cover the area relevant to the automation.
If a sensor controlling a desk lamp also detects everybody walking through the corridor ten metres away, the automation may technically work while producing a poor result.
A smaller and better-defined sensing zone is often more useful.
“Should every motion turn the light on?”
Again, not necessarily.
Home Assistant can ask several questions first:
Only then does it decide what to do.
That is the difference between:
a motion switch
and
a smart control system.
Do not stop at lighting
Once KW007 is visible in Home Assistant, motion becomes an input that can control almost anything connected to your smart-home system.
Here are some experiments worth trying.
Wake a display only when somebody approaches
Then switch it back to sleep after the person leaves.
This is particularly useful for wall panels, information displays and control interfaces.
Make a smarter entrance
One detection event can trigger several coordinated actions.
Control ventilation
A bathroom, utility area or workshop could combine:
to decide when ventilation should operate.
Activate a camera only when needed
Instead of running a camera-processing system continuously:
The radar becomes a low-complexity trigger for a more powerful system.
Build a “room active” state
Create one Home Assistant helper:
and let several sensors influence it.
For example:
Then make lighting, HVAC, displays and other devices respond to Room Active rather than individually responding to every sensor.
This is a useful first step toward a real occupancy-control architecture.
What will you make?
The interesting part of KW007 with ESPHome is not simply seeing a motion indicator change on a Home Assistant dashboard.
It is turning motion information into a useful decision.
Start with something simple:
Then ask:
What should happen when somebody approaches?
What should happen when somebody leaves?
How long should the system consider the space occupied?
What other information could make that decision better?
That is where a small radar sensor starts becoming part of a much smarter system.
KEYWAVE
KEYWAVE Technology Limited
Office : Mocatta House, Trafalgar Place, Brighton, BN1 4DU
Lab : Sussex Innovation Centre, Science Park Square, BN1 9SB, UK
Email: W@keywavetech.co.uk
Copyright © 1995-2026, Keywave. All Rights Reserved.